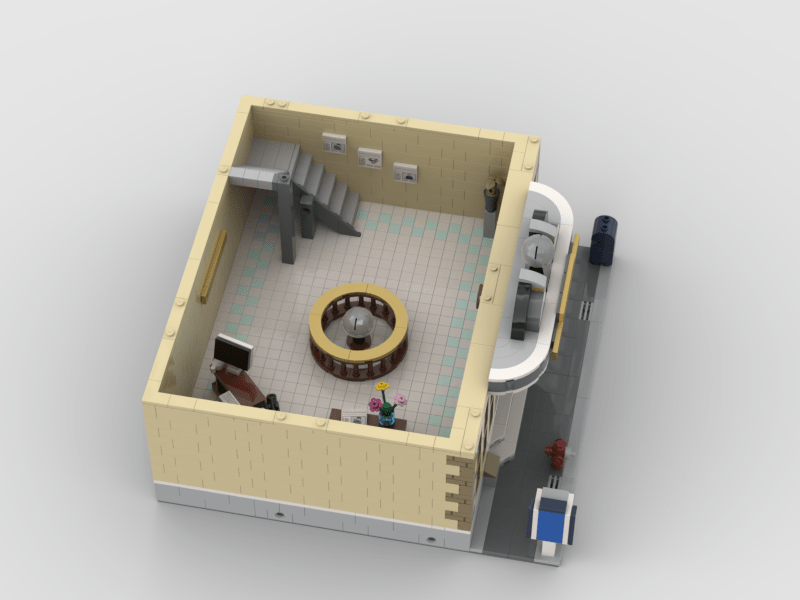
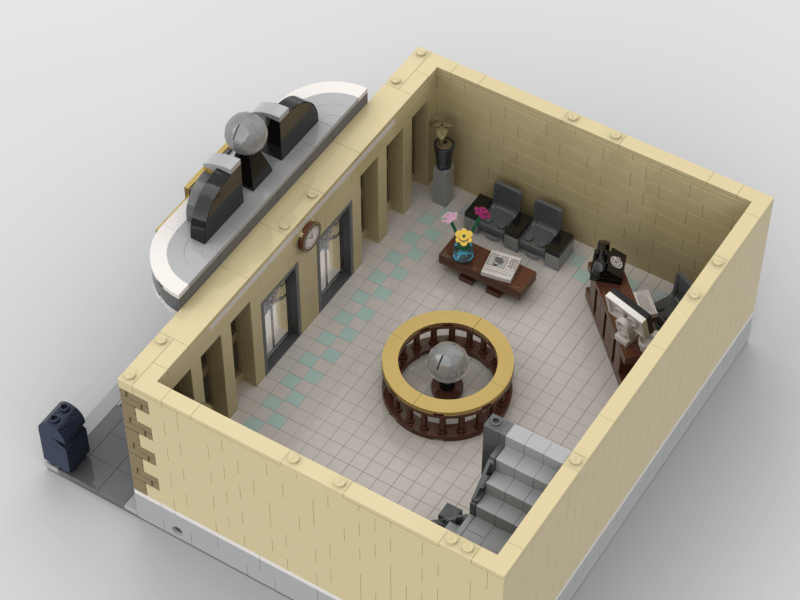
Sidewalk, Marquee Sign, and First Floor Lobby
For me, the first floor was foundational, both practically, as well as figuratively. Because of the shape of the building, the lobby would have the most free area of any of the floors above. In front of the building is a sidewalk that includes a mailbox (later changed to a newspaper box in my personal model), a fire hydrant, and “half” phone booth, a nod to the scene in the 1978 movie with Christopher Reeve where Clark paused to look at a similar phone booth that offered no cover for him to change, before running across the street to change in a revolving door.
Three steps lead up to the double doors into the lobby, and my choice of doors turned out to be one of the single most expensive elements in the model, the original doors from the Brick Bank modular.
Above the doors I created a custom printed gold LEGO tile with the Daily Planet address, 2525 Broadway on it. To the right of the doors below the rightmost window I created another custom gold tile with, “Est. 1775” printed on it.
Above the doors is the building Marquee sign that features three gold tiles custom printed with “The Daily Planet” and below it, “A great metropolitan newspaper,” another nod to the 1978 file, “Superman: The Movie” with Christopher Reeve. On top of the Marquee is a globe that I leveraged from the official Batman Classic TV Series Batcave (76052-1) that was displayed in Wayne Manor on Bruce’s office. The globe is made from two elements, 61287pb005 and 61287pb006, which snap together around a minifigure head. It was perfect for the front of the Planet.
Inside the lobby is a small “waiting area” with two seats, and a reception desk with a computer and phone. On the back wall is another set of signage reading, “The Daily Planet” and to the right a staircase leading upstairs. On the wall along the stairs are editions of the paper reading “Superman Lives!”, “Superman Dead!”, and “Brainiac Attack!”
In the center of the lobby a recreated the lobby globe from the Christopher Reeve movie using the same globe from the Batcave set and I was thrilled with how well it worked.
Tile or Studded Floors?
Another question I faced relatively early on was how to do the floors? On the one hand I liked the idea of “finished” tiles floors with a nice pattern, but part of the charm of LEGO is the studs. Eventually I opted for finished tiled floors and I experimented with lots of colors and patterns and eventually settled on white floor tiles with Aqua accent tiles around the outside. I selected this for several reasons, but most significantly because I didn’t know better. Doing the tiles took a huge amount of time in the real world, and as I have OCD tendencies I obsessed about them being nice and straight. Fortunately, I figured out a shortcut that I’ll now share.
The trick is to lay down a few tiles in a row, then take a 1 x brick and put it on the adjacent row of studs, but don’t push it down completely, rather lean it over towards the tile row until it presses the tiles into a nice straight line. Leaning the brick over closes the tiny tolerance gap between the tiles and the brick, causing the tiles to twist around the stud they are on until they are parallel to the brick.
I found that by using this technique I could easily lay down and perfectly align an entire floor of tiles in around 15 minutes.
Here’s a few photos of the finished lobby rendered in Stud.io: